The Buttery Blog

Everything's better with butter.

Just Baked Brooklyn November 29, 2009

Filed under: Uncategorized — butteryblog @ 5:56 pm

This is a very special edition of The Buttery Blog, and I am so excited to introduce Just Baked Brooklyn to everyone!

Oatmeal Cinnamon Butterscotch

I recently met up with Heather Lattuca Ferrari, the owner of Just Baked Brooklyn, at a cafe in the West Village. I asked her if she would talk about her new business, which is a year in the making, but just a few months in full swing! She happily accepted my offer, and brought some delicious samples with her. Over a lunch of savory crepes, we dished about food, life, and dogs.

Heather bakes up sweet treats for people and pooches. The company’s motto is “Life is Sweet.  Give a dog a treat.” …and why not give yourself a treat as well! She already has two business clients that have weekly orders.


What inspired you to create people and dog treats? 

I have always loved making cookies for friends and family.  When I moved to New York, people would hire me once in awhile to make a cheesecake or a bread or cookies.  I grew up in a restaurant family.  One of my parents’ first businesses was Just Baked, which was a seasonal (summer) pastry shop in Watch Hill, RI.  When I married my husband, a trained chef, I knew the journey would continue. 

Our inspiration for The Odie Collection (our dog treats) is our dog Odie.  We adopted him in November 2008 and fell in love!  He is my first dog and I never knew how much I could love an animal.  He is not always interested in food so I try and make treats that he likes.  Making dog treats is so much fun!

The Odie Collection


Did you have to do any special research to create the dog treats?

Yes!  Dogs are highly allergic to some very common baking ingredients, like chocolate.  I researched what types of foods are good for dogs (pumpkin, oats, apples, turkey, beef) as well as the flavors they generally love (peanut butter, cheese, bacon).  I was important to me to have a good combination of both.  Many dogs are allergic to gluten, so we have gluten free treats as well.


What is the favorite cookie on your menu?

The Chocolate Toffee Sea Salt cookie!  

(PS. Buttery B agrees. That cookie rocks!)  


What is your favorite bakery? 

My all time favorite bakery was Just Baked.  I love Henion Bakery in Amherst, MA.  In New York, I would have to say Amy’s Bread.


How long had you been thinking about creating your own business until you finally took action? 

A couple of years.  I moved to New York almost 8 years ago to pursue my acting/singing career.  Before I started seriously thinking about Just Baked Brooklyn, I wanted to see if there was a way to do both.  I am starting off at a slower pace with Just Baked Brooklyn so I can learn to truly balance both my acting career and baking business.


Do you have a mentor or role model? 

Many- my mom and dad, my husband, Julia Child, Cesar Millan.


What advice would you give to someone who is thinking about starting their own catering or baking business? 

The food business requires a lot of time and hard work, so you need to love it!  You need to enjoy making people happy.  Keep it simple and delicious. 

If you’re interested in learning more about Just Baked Brooklyn, become a fan on Facebook (http://www.facebook.com/justbakedbrooklyn). For orders, email your request to justbakedbrooklyn@gmail.com.


For The Buttery Blog readers, just mention “Buttery Blog” and get free shipping on one order until December 31, 2009.


♦ Buttery B

Just Baked Brooklyn Menu


The Odie Collection


A Southern Mother in New York November 24, 2009

Filed under: Uncategorized — butteryblog @ 11:21 pm

Kiss my grits!

The joys in my life are simple. One of the things I love to do is make food for someone that they have never tried. As you might imagine, in New York City that is quite hard to do. People here eat food from all over the world. Today was the Thanksgiving meal at Butter Boy’s class. We were supposed to bring in food from our own cultural background. It was the perfect storm for me. I could make some true Southern food that a lot of these New Yorkers had never tried. Yes! The dish- cheese grits. I bought grits- real grits- this summer when I was in North Carolina.

Southern Boil

Southern Boil

I have yet to come across grits here that are not instant and awful. This recipe doesn’t specify what kind of grits you need to use so let me specify for you. You need real grits, not Quaker instant grits from the super market. I use Daniel Boone grits which worked great.  The recipe that I used is from Paula Deen, of course! It was a big hit. I think you should try it!


Baked Garlic Cheese Grits

6 cups chicken broth

1 teaspoon salt

1/4 teaspoon pepper

1/4 teaspoon garlic powder

2 cups regular grits

16 ounces Cheddar, cubed

1/2 cup milk

4 large eggs, beaten

1/2 cup (1 stick) unsalted butter

8 ounces grated sharp white Cheddar

Preheat the oven to 350 degrees F. Grease a 4-quart casserole dish.


Bring the broth, salt, pepper, and garlic powder to a boil in a 2-quart saucepan. Stir in the grits and whisk until completely combined. Reduce the heat to low and simmer until the grits are thick, about 8 to 10 minutes. Add the cubed Cheddar and milk and stir. Gradually stir in the eggs and butter, stirring until all are combined. Pour the mixture into the prepared casserole dish. Sprinkle with the white Cheddar and bake for 35 to 40 minutes or until set.


Tray-Baked Meringue with Pears, Cream, Toasted Hazelnuts and Chocolate Sauce November 13, 2009

Filed under: Desserts — butteryblog @ 2:20 am
pear meringue

Makes a very indulgent breakfast too!

Hello, gorgeous! This is the first time I’ve ever cooked a meringue and I have to say, it’s pretty simple and completely amazing. Beautiful to look at and a delight to eat. A well-baked meringue is a thing of beauty: crisp on the outside and chewy on the inside. I used almonds instead of hazelnuts. The pears were nice, but honestly, I might try citrus or a berry medley. Really, any fruit and any nuts and any sauce will rock this dessert. Everyone will think you’re an amazing chef, but you’ll know…it really wasn’t that hard! Recipe is courtesy of the wonderful Jamie Oliver.

Tray-Baked Meringue with Pears, Cream, Toasted Hazelnuts and Chocolate Sauce

Serves 6-8

  • 4 egg whites
  • 1 1/4 cups raw sugar
  • Pinch of salt
  • 4 ounces hazelnuts, no skins
  • 28 ounces canned pear halves, with juice
  • 2 inch ginger thin slice (optional) (adds great zing)
  • 7 ounces bittersweet chocolate
  • 1 1/2 cups heavy cream
  • 2 ounces confectioners’ sugar, sifted
  • 1 vanilla bean scraped
  • Zest of 1 orange

1. Preheat your oven to 300F and line a baking sheet with wax paper.

2. Put egg whites in clean bowl and whisk on medium until firm peaks are formed. With mixer still running, gradually add raw sugar and salt. Turn mixer up to highest setting and whisk for 7-8 minutes until meringue is white and glossy. To test, pinch some between your fingers–should be completely smooth, not grainy at all.

3. Dot each corner of the wax paper with a bit of meringue, then turn over so it sticks to the baking sheet. Spoon meringue onto paper. Use back of spoon to shape and whirl into rectangle. Place in preheated oven and bake for 1 hour or until crisp on the outside and soft and sticky inside. At the same time, bake hazelnuts in the over for an hour or until golden brown (use separate baking sheet).

4. Drain the pears, reserving syrup from one can. Cut each pear half into three slices. Pour the syrup into saucepan with ginger and warm on medium heat until it starts to simmer. Take off the heat and break chocolate into it, stirring until melted.

5. Take meringue and hazelnuts out of oven and cool. Then place meringue on serving platter. Whip cream with confectioner’s sugar and vanilla until you have smooth, soft peaks. Smash hazelnuts in a kitchen towel and sprinkle half on top. Spoon over half the cream and some chocolate sauce. Divide most of the pear pieces over top. Pile on rest of cream and pears. More chocolate sauce. More hazelnuts. Grate orange zest on top. Serve immediately. If you make this in advance, prepare ingredients ahead of time and assemble just before serving (may need to reheat chocolate over double boiler).

GRADE: A

♥Lady Butterbuns


Autumn on a Plate November 8, 2009

Filed under: Vegetarian — butteryblog @ 11:35 am
Tags: ,

Growing up in the South, I lived off of canned vegetables. Creamed corn with extra butter, anyone? Yes, we did have small farmstands on the side of the road, but I think the only time we ever actually stopped was to get baskets full of Georgia peaches.

So when I moved to New York, the farmer’s market became a place to get in touch with nature among the urban concrete. It took me a while to get comfortable with the farmer’s market. It was all so wonderful, but also overwhelming. I would go and leave empty-handed because I didn’t have a plan.

About 5 years ago I changed my perspective. I decided to go to the farmer’s market without a plan (and be okay with that), see what was in season, pick something, and then figure out what to do with it. One year I chose a butternut squash. At that point I don’t think I had ever even eaten butternut squash. I certainly didn’t know what was inside or how I was supposed to cut it up.

Luckily I found a Butternut Squash Risotto recipe in Martha Stewart Living. Now, at that point I had also never made risotto so I was really challenging myself. Of course, I wouldn’t have written 3 paragraphs if it hadn’t turned out to be out-of-this-world. I make it at least once a year. It’s creamy and cheesy, and warm with a dash of nutmeg.

Martha Stewart’s Butternut Squash Risotto

Ingredients
Serves 4 to 6
1 medium butternut squash
6 cups Homemade Chicken Stock, or canned low-sodium chicken broth, skimmed of fat
2 tablespoons unsalted butter
1 tablespoon olive oil
4 shallots, minced
2 cups Arborio rice
1/2 cup dry white wine
Freshly grated nutmeg
Salt and freshly ground black pepper
1 tablespoon chopped fresh rosemary, plus sprigs for garnish
1/2 cup freshly grated Parmesan cheese

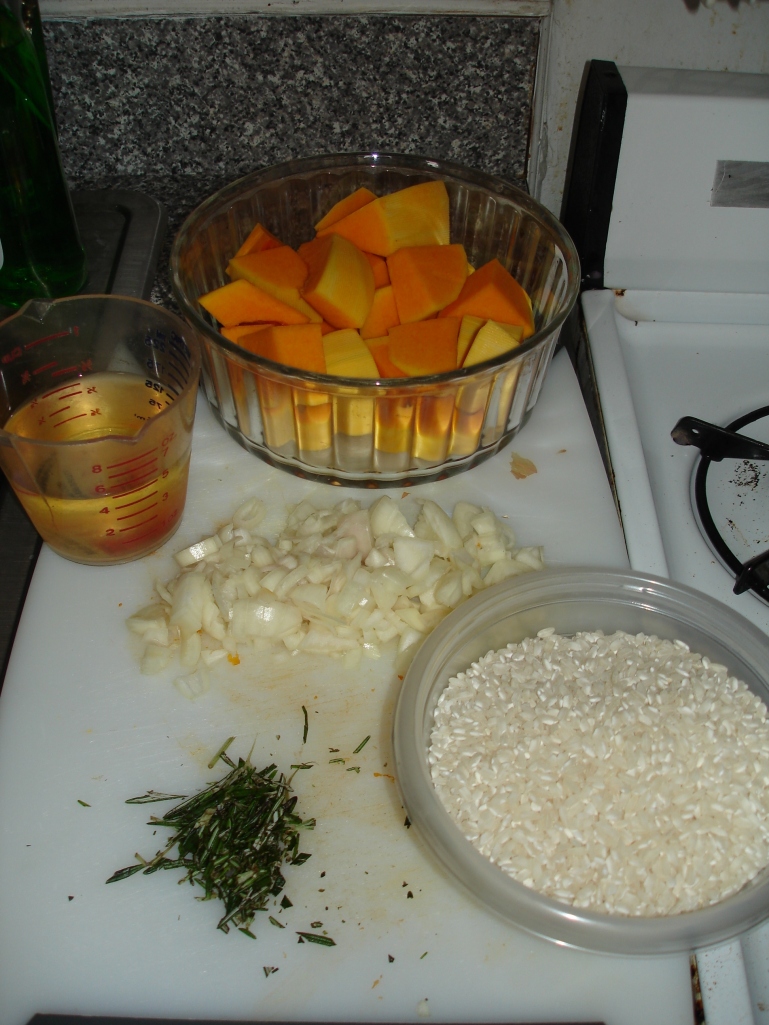
Preparing the Ingredients

Preparing the Ingredients

Directions

  1. Cut squash into eighths; discard seeds. In a large pot filled with 1 inch of simmering water, steam squash on a steaming rack or in a bamboo steamer until tender, 10 to 15 minutes. Scoop flesh from skin and mash lightly.

    Mashed Butternut Squash

    Mashed Butternut Squash

  2. In a large saucepan, heat stock to a simmer. In a large heavy saucepan over medium heat, melt 1 tablespoon butter. Add oil and shallots; cook for 2 minutes. Add rice; cook, stirring, for 5 minutes.


    Onions and Butter

    Onions and Butter

  3. Add wine to rice, and cook, stirring, until wine is nearly absorbed. Stir in a cup of stock and the squash; cook at a steady simmer until liquid is nearly absorbed. Continue stirring in stock, a ladleful at a time, until rice is creamy and firm but not hard in the center, 15 to 20 minutes. Add nutmeg, salt, and pepper to taste. Add chopped rosemary. Stir in remaining butter and most of the Parmesan. Serve immediately in shallow bowls garnished with the remaining cheese and rosemary sprigs.


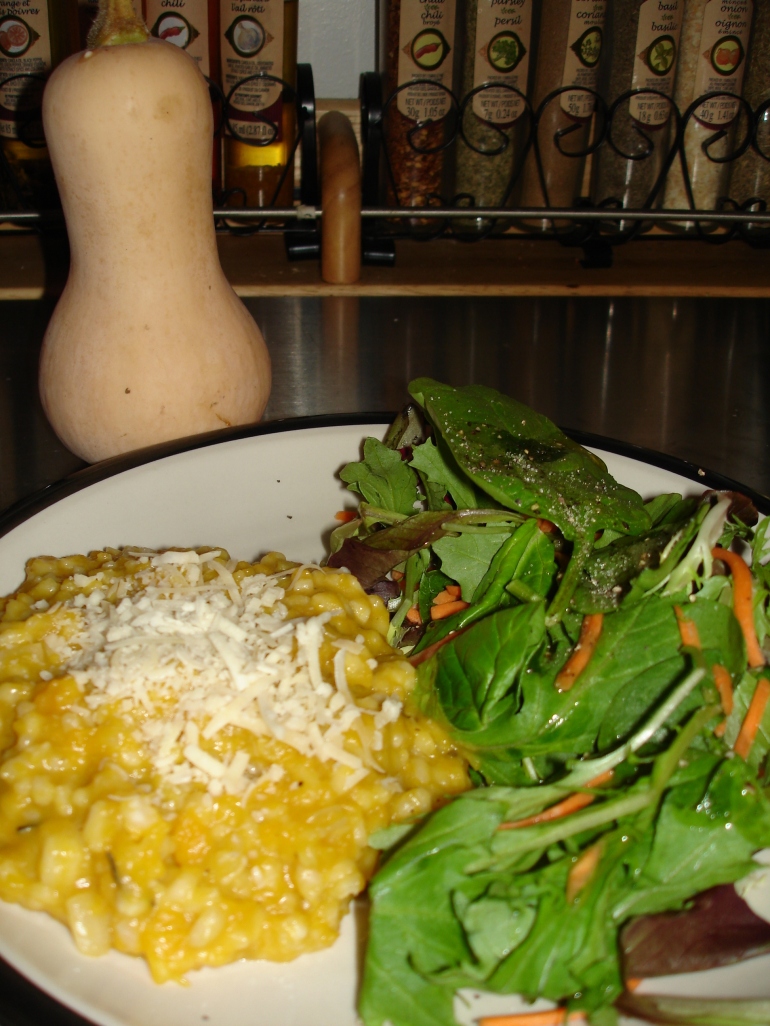
    Butternut Squash Risotto and Lots of Greens

    Butternut Squash Risotto and Lots of Greens

Happy Autumn!

♦ Buttery B


Potatoes Anna November 2, 2009

Filed under: Vegetarian — butteryblog @ 1:43 am
Tags:
potatoes anna

Anna, I love your potatoes.

How could four simple ingredients–potatoes, salt, pepper and butter–taste so darn good? This is seriously delicious and easy and beautiful. I can’t say enough how impressed I was with myself. The top and bottom are crunchy like potato chips, but the middle layers are soft and creamy. I co-worker saw me eating the leftovers at lunch and immediately went home to make his own. Feel free to add some chopped rosemary or garlic, but it’s also great on its own.

Potatoes Anna

Makes 8 servings

  • 2 3/4 pounds russet potatoes (about 6), peeled
  • 6 tablespoons unsalted butter melted
  • Salt and pepper

1. Preheat oven to 450°. Using a mandoline, slice potatoes, 1/4 inch thick, or thinner. (Do not place potatoes in water at this point; the starch is needed to bind the layers.) (I don’t own a mandoline, so I used the blade attachment on my food processor. You can cut them by hand, but it’s hard to get them as thin as necessary.)

2. Brush bottom of a 10-inch cast-iron skillet or a 9 1/2-inch deep-dish pie plate with 1 1/2 tablespoons melted butter. Starting in center of pan, arrange potato slices in a circular pattern, overlapping the edges. Evenly brush with 1 1/2 tablespoons butter; season with salt and pepper. Repeat with remaining potatoes and butter, creating 2 more layers. (The next time I make this I will do 7 or 8 layers to get some good height.) Finish with a final layer of butter, salt, and pepper. When arranging potatoes, be sure to fill in all the spaces.

3. Place over medium-high heat until the edges of the potatoes begin to brown, 3 to 4 minutes. If you are not using a cast-iron skillet, this step is not necessary.

4. Place in oven, and bake until potatoes are fork tender, 45 to 55 minutes for the cast-iron skillet and 1 to 1 1/2 hours for the pie plate. Remove from oven, and let rest 5 to 10 minutes. Using a small spatula, separate potato edges from sides of pan. Shake pan and slide a spatula along bottom to loosen potatoes. Carefully invert onto a flat serving platter. Slice and serve.


GRADE: A+

♥Lady Butterbuns


PS-I forgot to mention that the recipe came from this lovely lady. Also, a friend suggested using clarified butter so that the bottom doesn’t over-brown. Sounds smart to me.